Glitching over KeepKey Firmware Protections (VULN-21020)
I have recently discovered and demonstrated a new vulnerability in the KeepKey hardware wallet. Unlike some previously reported issues, this vulnerability is triggered by electrical fault injection and requires invasive physical access to the target device, but it has some interesting characteristics that makes it easier to achieve than other attacks of this nature.
ShapeShift has patched the issue via a firmware update after the coordinated disclosure.
Contents
Consulting
I’m a freelance Security Consultant and currently available for new projects. If you are looking for assistance to secure your projects or organization, contact me.
Introduction
The subject of this discovery is the KeepKey hardware wallet that stores and handles secrets related to cryptocurrency funds. As with many of my previous blog articles, this is going to be a technical deep-dive into a complex security bug. Correspondingly, the article is written for technical readers with a background in the area of IT security.
If you are a wallet user and concerned about your security, here is a bit of context and advice:
- this research is about a trick that attackers can use to lower some wallet defenses and clear a path for other attacks
- the main scenario involves stealing and opening the KeepKey - take steps to prevent that
- use a strong PIN and a strong BIP39 passphrase to make life generally harder for attackers
- the issue is fixable in software and no longer present in the newest firmware version, though firmware downgrades still leave a window of opportunity
- I would rate the hardware attack issue as a low to medium on a low-medium-high-severe scale
- regularly upgrade your wallet firmware to stay on top of security issues
Technical Background
In order to provide protection and defense-in-depth mitigations against various attacks, the KeepKey makes use of a number of security mechanisms that are available on the STM32F205 microcontroller. Most of the general security design is similar to the Trezor One, which is the original basis of the KeepKey development.
Two mechanisms are primarily relevant for this article:
- The Memory Protection Unit (MPU) can be used to mark different memory regions as inaccessible, read-only or non-executable to set hard boundaries for the firmware code. This helps to detect and abort on problematic code behavior and can limit the impact of security vulnerabilities that are based on memory corruption bugs, such as writing data in the wrong place or manipulating the code execution.
- The main firmware code drops to a lower-privileged mode where it has to ask a second system for certain dangerous actions such as persistent flash writes. This helps to limit the impact of malicious actions in the firmware code, for example by disallowing flash writes into the bootloader section to ensure trusted boot integrity.
In order for these protections to work well, it needs to be difficult for an attacker to revert them. For example, an arbitrary code execution vulnerability in signed firmwares such as the one I found earlier this year or regular code in user-generated unsigned firmwares should not be able to circumvent the protections. However, the MPU configuration in particular is complex and might need to be adapted for some reason in the future, so there are advantages if an official firmware can individually change the configuration instead of requiring a new bootloader each time.
The KeepKey boot process with bootloader 2.0.0 has two different logical paths to accomodate this:
| Case | Bootloader startup | Firmware startup (goal) | MPU configuration |
|---|---|---|---|
| signed firmware | - | activate protections | via firmware |
| custom firmware | activate protections | - | via bootloader |
One of the essential tasks of the bootloader is to determine on each device start if the firmware is official, meaning that the firmware segment in the flash has valid signatures which check out with the vendor public keys known to the bootloader.
This happens via the signatures_ok() function, which has the following steps:
- read the firmware flash contents
- compute a SHA256 hash over the firmware data
- check three ECDSA signatures over the hash
- return
SIG_OKif all three match, otherwise return error codes
The overall function call takes around 920 milliseconds on the ARM Cortex-M3 chip @ 120 MHz clock speed, which is a long time.
The Vulnerability
Consider the following firmware code:
static bool canDropPrivs(void) {
  switch (get_bootloaderKind()) {
[...]
    case BLK_v1_1_0:
      return true;
    case BLK_v2_0_0:
    case BLK_v2_1_0:
      return SIG_OK == signatures_ok();
}The signatures_ok() function is re-used for the firmware code canDropPrivs() to correctly self-determine if it is officially signed and decide on the corresponding protection steps for both the MPU as well as the privilege separation.
In other words, the bootloader and the firmware each perform separate and completely independent checks of the firmware signing state during boot and then use their results to determine if it is their job to activate the protections.
The implicit assumption is that multiple signatures_ok() checks during different parts of the boot process return identical results since no changes to the relevant flash data are performed.
I think you can see where this is going - the assumption is wrong.
Through the use of fault injection techniques, an attacker with physical access to the internal device electronics can disturb some of the many mathematical
computation steps of the signature check and produce incorrect signature results even though the flash memory hasn’t changed.
Generally, the signatures_ok() logic is designed with some robustness against fault injection attacks that have the goal to produce a SIG_OK check result for incorrectly signed firmware.
Getting to a SIG_OK result in this scenario requires skipping or passing multiple complex checks and computations with a high level of precision, making it much more difficult to achieve for attackers.
Unfortunately, signatures_ok() is not at all robust against fault injection attacks that produce a SIG_FAIL or KEY_EXPIRED signing check result for a correctly signed firmware.
Within the original trusted boot logic, this was not necessary as that case was not a practical security problem, but it has now become an issue due to the re-use of the function in a different context.
The fact that there are over 100 million CPU cycles involved in the signing check works in favor of the attacker, since most of them have to be executed correctly to generate the correct result.
This is an absolutely huge target for fault injection compared with the usual microsecond-level precision to target small groups of individual CPU instructions.
Additional details will be described in the demonstration section.
Attack overview:
| Case | Bootloader signatures_ok() |
Bootloader | Firmware signatures_ok() |
Firmware decision | Firmware behavior |
|---|---|---|---|---|---|
| signed firmware | SIG_OK |
- | SIG_OK |
activate protections | normal operation |
| signed firmware with attack | SIG_OK |
- | ↯ fault injection -> SIG_FAIL or KEY_EXPIRED |
skip protections | “normal” operation without essential protections |
Conceptually, this situation has strong similarities with a time-of-check-to-time-of-use (TOCTOU) scenario.
The Fix
The primary solution for this issue was to switch from the lengthy signatures_ok() to a faster and less complex check that determines the firmware signing status within the canDropPrivs() logic with less attack surface.
In their implementation, ShapeShift decided to check for the presence of signatures:
-      return SIG_OK == signatures_ok();
+      // sigs already checked in bootloader. If a sig is present we are in priv mode, drop privs.
+ return *((uint8_t *)FLASH_META_SIGINDEX1) != 0;Additional patches then added some fault injection countermeasures through the custom fi_defense_delay() logic primitive of the KeepKey.
A positive side effect of moving to a new and shorter check logic is that it reduces the boot-up time of KeepKeys by about a second over the unpatched behavior.
This is a nice functional benefit.
A logic bug in the final patch by ShapeShift for the v7.1.5 firmware unintentionally disabled the microcontroller protections for the signed release version by default, see PR#282.
Unfortunately, this was found only after the release through functional issues with unsigned firmware.
The first correctly patched version is firmware v7.1.7, which is therefore the recommended minimum version to upgrade to.
There are some remaining concerns for attack scenarios where a firmware downgrade to v7.1.5 is plausible,
see also PR#285.
If you have a signed firmware copy of firmware release v7.1.5, please contact me here.
Proof-of-Concept 🔒🪓
It is time for some hardware hacking!
To give you an overview over the device internals, here is a photo of the KeepKey PCB and OLED display, which are normally sandwiched together. Getting the PCB out of the enclosure intact is an invasive process, however it can be done on the first try. The wallet shown below is still fully operational and gives us access to a number of helpful contact points. There is no active tamper protection.

There are multiple techniques to perform fault injection. For this Proof-Of-Concept, I focused on clock glitching of the external quartz oscillator clock signal, but other mechanism such as voltage glitching and electromagnetic fault injection (EMFI) would be possible as well. For clock glitching, the external clock is tampered with for short durations of time, leading to missteps of the microcontroller at intentional points in time while otherwise running the program normally.
Our target signal is routed here:
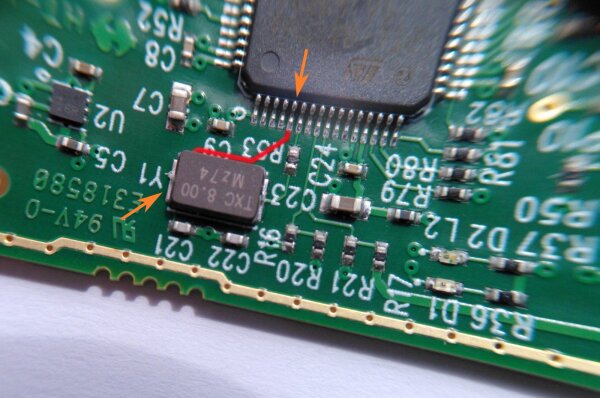
Y1 and the OSC_IN input on pin 5In order to bring the clock signal under external control, this line is cut and the microcontroller pin is routed to a SMA connector. The following photo was taken during the hardware modification, note the silver wire to the center left which will be connected to the PCB trace in the next step.
The black jumper and the second SMA connector to the top right are not required for the attack and were added for debugging and analysis purposes.
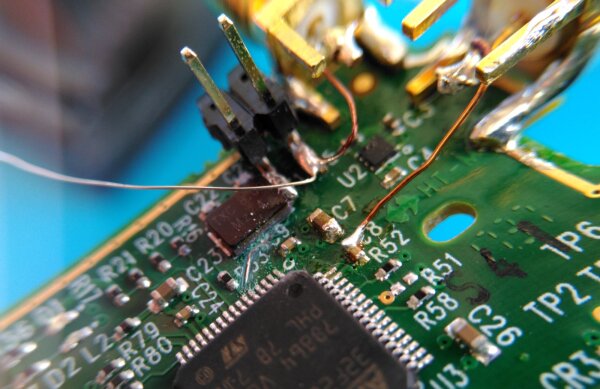
Getting access to the clock line is the only mandatory modification step. There are two other useful electrical contacts:
- the device reset line on pin 10 of the TC2050 programming header
- the D2 LED that indicates the boot state
These two signals help with automating the glitching process, which is important during research of a new glitching vulnerability as it is infeasible to do many glitching attempts by hand. I decided to use flexible probes to contact those points instead of soldering fixed wires, which worked well.
The following photo shows the KeepKey close up under practical glitching conditions, including an extra connection to the oscilloscope on the left.
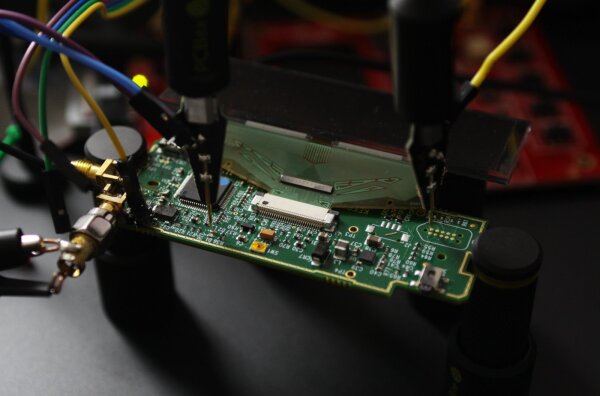
There are a number of devices involved that make up the experimental setup in the next photo:
- the modified KeepKey is in the bottom center
- in the center is the red ChipWhisperer CW308 target board that houses the alternate oscillator component & driver
- to the top left is the white ChipWhisperer Lite in a 3D-printed enclosure, this is the central clock glitching control
- at the top of the frame is a 4-channel oscilloscope with a clock generator output
- to the right is a semi-custom USB power shunt module for power analysis
Keep in mind that most of this equipment is either for analysis tasks or more powerful than it needs to be to trigger this vulnerability. For successful glitching, one could probably get away with a standard microcontroller and some dedicated components, although it wasn’t worth going down that route for this Proof-of-Concept.

As described in previous sections, the expected effect of a successful fault injection in the firmware startup logic is a firmware that runs normally, except without essential protections. There is no visual difference on the display if that happens, which is inconvenient when cycling through hundreds of attempts and looking for a lucky success.
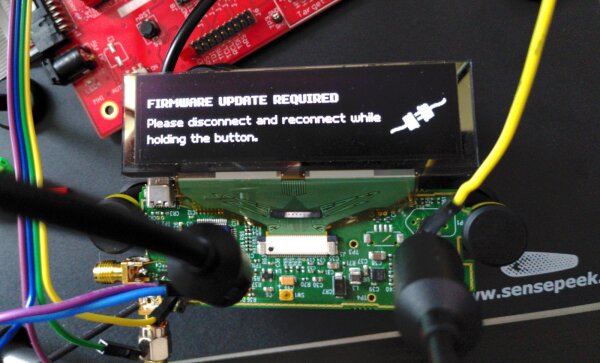
So my first target was triggering a SIG_FAIL result in the signatures_ok() check in the bootloader:
static void boot(void) {
[...]
  int signed_firmware = signatures_ok();

  // Failure due to expired sig key.
  if (signed_firmware == KEY_EXPIRED) {
    layout_standard_notification(
        "Firmware Update Required",
        "Please disconnect and reconnect while holding the button.",
        NOTIFICATION_UNPLUG);
    display_refresh();
    return;
  }

  // Signature check failed.
  if (signed_firmware != SIG_OK) {
[...]
    if (!confirm_without_button_request(
            "Unofficial Firmware",
"Are you willing to take the risk?\n"The expected symptoms are that the KeepKey shows the UNOFFICIAL FIRMWARE warning when booting a firmware that is actually signed.
After some time and experimentation, this worked, as can be seen from the screen contents in the previous overview photo.
Success! \o/
There are four different places that the signatures_ok() function returns after long computations:
int signatures_ok(void) {
[...]
  sha256_Raw((uint8_t *)FLASH_APP_START, codelen, firmware_fingerprint);

  if (ecdsa_verify_digest(&secp256k1, pubkey[sigindex1 - 1],
                          (uint8_t *)FLASH_META_SIG1,
                          firmware_fingerprint) != 0) { /* Failure */
    return SIG_FAIL;
  }

  if (ecdsa_verify_digest(&secp256k1, pubkey[sigindex2 - 1],
                          (uint8_t *)FLASH_META_SIG2,
                          firmware_fingerprint) != 0) { /* Failure */
    return SIG_FAIL;
  }

  if (ecdsa_verify_digest(&secp256k1, pubkey[sigindex3 - 1],
                          (uint8_t *)FLASH_META_SIG3,
                          firmware_fingerprint) != 0) { /* Failure */
    return KEY_EXPIRED;
  }

  return SIG_OK;
}To confirm that the glitch is working as expected, I triggered the more specific KEY_EXPIRED case by making the third ecdsa_verify_digest() call fail,
which results in a different warning that is unusual and unique:
KEY_EXPIRED in the bootloaderThose cases are already a Proof-of-Concept for the general glitching attack.
Still, I wanted go one step further and show evidence of successful fault injection in the signatures_ok() target within the firmware that actually controls the protections.
Since there are no visual changes on the device screen after a successful injection,
I made this observable by using the timing differences of signatures_ok(). If the function exits early after the first ecdsa_verify_digest(), the result is available far sooner than for normal runs where all computations are made.
Consider the following annotated oscilloscope graph, where the computation times of the three ecdsa_verify_digest() calls of the firmware are highlighted as the regions 1, 2, 3.
The yellow trace is the power analysis pattern of the KeepKey that is measured over the +5V USB power supply line.
A repeated pattern of fault injections is triggered during the cryptographic computations of the first ecdsa_verify_digest() check.
In this trace, the computation result is unchanged and the firmware finishes the second and third check, which leads to final boot-up at time marker B.
The different wave pattern at the end of the yellow trace corresponds to OLED display activity that happens after startup.
In this case the firmware runs normally and with protections.
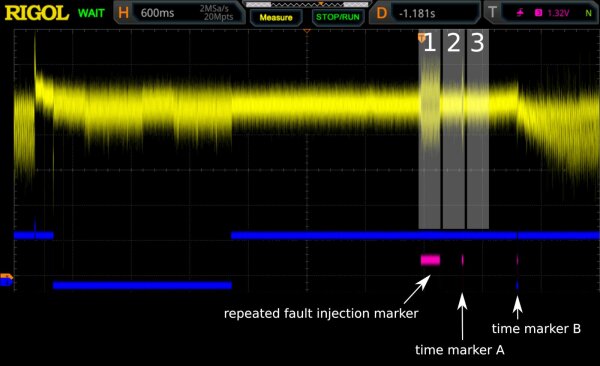
The following graph shows a successful fault injection where the signature check is aborted after the first ecdsa_verify_digest() call via return SIG_FAIL;,
shortening the overall firmware startup time and finishing on time marker A, roughly 600ms earlier than before.

This firmware starts up normally, but with disabled protections. This state has been confirmed by triggering the VULN-1972 and VULN-1974 issues on older firmwares that would normally crash via the MPU protections, but do not once the MPU is disabled.
Success again ↯ \o/
To conclude, here is a real-time video recording of the oscilloscope during the automated glitching process. After some fine-tuning, it usually took only half a dozen automated tries on average to glitch into the special state, which is pretty decent.
Note that the time window of the graph corresponds to the right half of previous oscilloscope pictures.
SIG_FAIL after the first signatures_ok() ECDSA check, resulting in observable timing differences
Attack Scenario
Reasons why this issue is concerning:
- this vulnerability can be used to break the trusted boot isolation
- it makes it easier to run custom code in case of a code execution vulnerability
- it has been present in all recent firmware versions since early 2020
- downgrading target devices to older firmwares with known security issues is possible
Reasons why this issue is not that concerning:
- for the fault injection scenario, the attacker needs to destructively open at least part of the device
- a meaningful second vulnerability must be available and reachable by the attacker to do practical attacks
- in a theft scenario, attackers are assumed to not have the PIN, which makes it difficult to run most of the “relevant” second-stage attacks that are publicly known. If they had the PIN, they could move money directly off the wallet in many cases via the normal functionality.
- if an attacker just wants a custom bootloader for testing or for supply chain attacks, it is easier to solder in a new microcontroller with the factory configuration
- the well-published RDP2 downgrade hardware attack is to my knowledge still relevant and harder to fix
Coordinated Disclosure
My overall impression with the disclosure is positive. Due to several recent security issues that I have reported to ShapeShift, there were still some ongoing technical followup discussions with their security team where I could raise this new issue and discuss the implications, including time in a videocall that had been scheduled previously.
There were some minor gaps in the vendor communication of the patch and disclosure scheduling, but overall that went fine as well. Notably, the patch release was quickly followed by an advisory, which is an improvement over previous issues.
Reporting hardware-related vulnerabilities can be complex and the practical impacts are often controversial, but I see it as very positive that the vendor followed up on the issue and implemented a solution for it.
Relevant Product
| Product | Source | Affected Version | Fixed Version | Patch | Publications | IDs |
|---|---|---|---|---|---|---|
| ShapeShift KeepKey | GitHub | firmware v6.1.x to v7.1.4 with bootloader 2.0.0 | firmware v7.1.7 (see notes) | patch1, patch2, patch3 | v7.1.5 changelog, v7.1.7 changelog, ShapeShift advisory | VULN-21020 |
I’m not aware of other affected hardware wallets.
Detailed Timeline
| Date | Information |
|---|---|
| 2021-05-01 | Detailed discussion of the attack idea with ShapeShift |
| 2021-05-26 | Proof-of-Concept & official disclosure to ShapeShift |
| 2021-05-26 | ShapeShift acknowledges the report and assigns VULN-21020 |
| 2021-05-27 | Conference Call with ShapeShift |
| 2021-05-28 | Followup to ShapeShift with additional attack information |
| 2021-06-30 | ShapeShift communicates planned patch |
| 2021-07-07 | ShapeShift communicates pull requests with planned patches |
| 2021-07-08 | ShapeShift releases patched firmware version 7.1.5 on GitHub |
| 2021-07-09 | ShapeShift publishes security advisory |
| 2021-07-13 | ShapeShift releases patched firmware version 7.1.7 on GitHub |
| 2021-07-20 | Publication of this blog article |
A Note About Research Affiliation
I want to emphasize that this research was done on my own time and initiative. In particular, it was not sponsored by SatoshiLabs, for whom I do some paid freelance security research on the related Trezor project.
Bug Bounty
ShapeShift has paid a bug bounty for this issue.